
Unlocking a bootloader allows us to install a custom recovery like twrp that can be used to flash custom zips, firmware, and patches. They are either available online or build by developers to spice up your phone with additional functions that might be absent from your stock/factory firmware. So let’s start the process step by step.
Warning CodeHabitude is not responsible for any damage to your device by doing the process to unlock the bootloader, if you are a complete newbie then I would suggest taking the help of an experienced geek.
Requirements
The same Tutorial can be applied to any xiaomi smartphone. Make sure to download the correct files of the respective device.
- Proper ADB Drivers installed on a Windows-based computer
- Install Xiaomi Drivers – most important as fastboot drivers were not working correctly in my case without these drivers.
- In case Xiaomi drivers fail to load, then I request you to disable driver signature enforcement.
- A Windows-based computer.
- Original Xiaomi USB cable.
- Redmi Note 7 PRO…isn’t it obvious.
- Charge your phone’s battery to a sufficient level to avoid sudden shutdown during the unlocking process.
If no driver is working for you, then you might try the list available at Xiaomi Advices.
Steps To Unlock Bootloader Of Redmi Note 7 Pro
- Enable “OEM unlocking” and “USB debugging” in your device. Settings >> About Phone >> MiUi Version >> Tap several times to enable developer options.
- Once you have enabled developer option head to Settings >> Additional Settings >> Developer options and check “OEM unlocking” and “USB debugging.”

- Connect your phone to your PC via Xiaomi’s USB Cable.
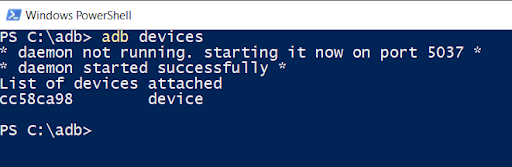
- Go to the installed folder of ADB, typically it should be C:\adb.
- Shift + right-click >> PowerShell window >> Type ADB devices. If every step has been followed till now carefully, you should see your device listed else go through steps again 🙂
- Check If your Bootloader is Locked- Type ADB reboot bootloader to boot into fastboot mode.
- If the above method did not work then first power off your device.
- Press Vol.Down + Power button simultaneously to boot into fastboot mode.
- Now again go to that ADB folder C:\adb.
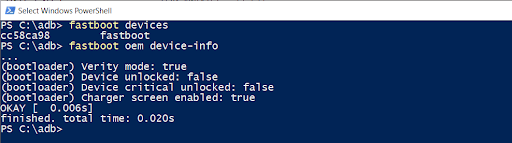
- Shift + right-click >> PowerShell window >> type fastboot devices to confirm that your device is detected successfully.
- Now type the code: fastboot OEM device-info
Final Steps To Unlock Bootloader
- Create a Mi Account.
- Connect your Mi Account to your device.Settings>>Additional Settings>>Developer Options>>Mi Unlock status>>check Add account and device” and add the Mi account that you just created.* You won’t be able to perform the process unless you remove all the devices associated with that same mi account so remove all other devices *
- You must enable “OEM unlocking” and “USB debugging.”
- You must connect your Mi Account with your device
- Download Mi Unlock Tool.
- Install and open Mi unlock tool then sign in using the same phone number that you used to create the mi account.
- Enter the fastboot mode by holding together “Volume Down + Power” and connect your device to your computer via USB cable.
- Start the Unlock process. Unlock will erase user data.
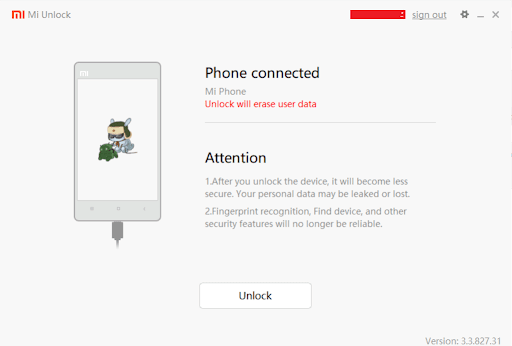
- Follow all the instructions carefully until the unlocking process is finished.
- It may ask you to wait 72 hours or more. So please be patient and apply the process after that given time frame.
- Reboot your device.
Note – If you get the error: your device is not supported by Mi Unlock then click on the Go button on the screen. And you will be directed to a link that helps you to apply for the unlocking process. - Click the Unlock Now button.
- Fill the required details carefully and submit them.
- Enter your phone number and OTP.
- You need to wait until your application is accepted for unlocking bootloader.
- You will get a message saying “You are now eligible to unlock the bootloader of your Redmi Note 7 Pro.
- Now perform the above steps again from Mi Unlock Tool.
Check if it is Unlocked - Go to ADB folder C://adb
- Shift + right-click >> PowerShell window >> type fastboot devices to confirm that your device has been detected successfully.
- now type the code: fastboot OEM device-info
TWRP AND ROOT
A custom recovery can help to install third-party firmware to modify your device that you cannot do with a stock recovery. Twrp was developed initially for nexus devices, but it has been made available for a countless number of smartphones including Pixel devices, Samsung, Xiaomi, Nokia, etc.
Steps To Install Twrp Recovery In Redmi Note 7 Pro
All Methods are confirmed with Redmi Note 7 Pro and they should work with any Xiaomi Smartphone.
- You must have an unlocked bootloader.
- Now boot your phone into fastboot mode by pressing vol.down + power button simultaneously.
- Download Twrp Recovery for Redmi Note 7 Pro.
- Download ADB drivers and go to the installed folder of ADB, typically it should be C:\adb.
- On the same folder >>Shift + right-click >> PowerShell window >> Type fastboot devices.
- You should see your device listed but if you cannot see your device there do not worry, simply install xiaomi drivers.
- Once your device confirmed as a fastboot device, then type code:
fastboot flash recovery File_Name.img - Reboot into Twrp Recovery by Vol.up + power button.
Steps To Root Redmi Note 7 Pro
Magisk is known as a “systemless” root method. It’s mostly a way to modify the system without actually changing it. Magisk does not modify system files that allow us to use payment apps without any problem. And it is considered the safest way to root any device.
- Download Magisk File and copy it to the internal storage of the phone.
- Boot into Twrp Recovery.
- Install the Magisk Zip file.
- Reboot.


