
Nowadays, it’s easier now more than ever to create an eCommerce business. Unless you’re selling physical products, there is no need to even leave the comfort of your home!
Online stores are on the rise, and if you’re looking to start, now is the time to do so.
Even if you don’t have first-hand experience with creating a website, fear not.
In this short post, we’ll take you through the process of creating an eCommerce website on WordPress using the WooCommerce plugin.
But before we begin, let’s start with the basics.
Post Contents
Purchase Hosting and Domain Names
The first thing you need to do is purchase a domain name and hosting.
There are plenty of places from where you can purchase domain names, the primary ones being GoDaddy and Domain.com. Ideally, you should select a domain name that’s suited to your niche and is also unique.
Next up, you have hosting. There are plenty of different types of hosting services available online. If you’re going to be running an eCommerce website, then we would recommend that you select a host that specialized in that niche.
SiteGround’s WooCommerce hosting focuses solely on building your eCommerce store on WordPress. However, if you want to choose a different hosting service, then you should generally keep this checklist in mind before selecting a host.
When you’ve selected a domain name and host, you will gain access to the cPanel of your host. That’s the place where you’ll enter your domain name, and more importantly, install WordPress. This brings us to the next section of this post.
Installing WordPress
In the cPanel of your hosting server, you will have the option of installing WordPress. Before this, installing WordPress was a chore to say the least. Now, most modern web hosts have made it rather easy to install WordPress by creating an installer wizard.
The wizard will take you through the process of adding the name of your website, setting your password, initializing the database, and more.
Once you’ve finished setting up WordPress, it’s time you access the backend of your WordPress website. Simply enter your site name followed by “/wp-admin”. It goes something like this:
mywebsite.com/wp-admin
Enter your username and password and you will be redirected to your WordPress dashboard which looks something like this.
Now that we’ve set up WordPress, it’s time we install WooCommerce.
But before that, let’s take a quick look at WordPress themes.
Installing WordPress Themes
From your WordPress dashboard, if you navigate to Appearance > Themes, you will find a variety of themes that you can apply on your store.
Now, not all WordPress themes are built the same. Some themes are better designed and have plenty of customizability on them compared to other themes. On top of that, some of them are built for regular website management while others are built specifically for WooCommerce.
There are several considerations that you need to take into account before selecting a WordPress theme. Oftentimes, users become quick in their decision to install a WordPress theme. Because of this, they install a theme without careful consideration only to revamp their whole website to facilitate a new theme.
A theme is something you’re going to be working with for a long time, so plan ahead before you select a theme.
Page Builders and Theme Editors
There are two major ways you can go about editing a WordPress theme: through the WordPress customizer or through a page builder plugin like Elementor or Beaver Builder.
But the difference between them is that the former allows you to make edits to the basic WordPress layout. The latter, however, puts you in the seat of a professional designer – allowing you to create aesthetically designed websites in no time at all.
To create a WooCommerce store, you would need a WooCommerce theme. This process can be performed when you’ve installed the WooCommerce plugin.
Installing WooCommerce
Now, let’s get down to installing WooCommerce on your store. From the WordPress sidebar, select Plugins > Add New.
You will be led to the WordPress plugin store. On the search box at the very top, type in WooCommerce, and install the one with the 5+ million active installations.
When WooCommerce has finished installing, all you have to do is start the WooCommerce wizard and go through the step-by-step process.
Firstly, you need to enter the location of your store, the currency you want to use on it, and the product niche.
Once that’s done, click on “Let’s Go” to continue.
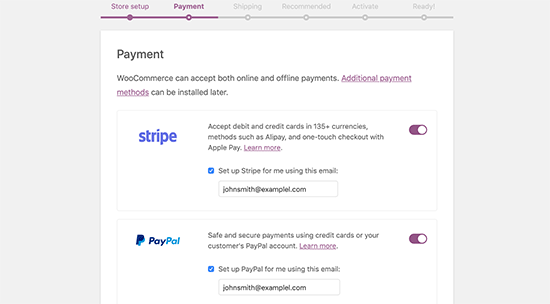
In the next step you have to select the payment methods. WooCommerce supports a variety of local and international payment methods, but has built in support for PayPal and Stripe as primary payment gateways.

You can start with either of the two to finish the setup. Simply provide your email address to set it up.
If you want to change the payment methods later on you can do so by visiting WooCommerce> Settings and going to the Payments tab.
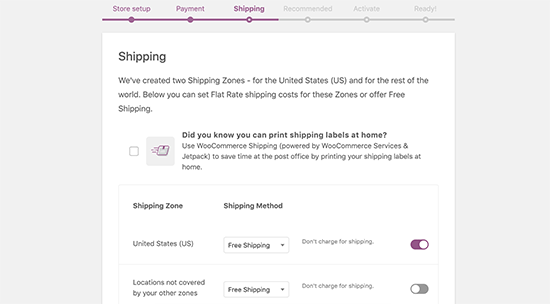
Next up, set up which shipping method you should set up.
When you click on Next, you will be asked to enter the recommended services for WooCommerce. You can uncheck them for now, but if you really like one or two of these services, you can check them.

Afterwards, you will be asked to set up the Jetpack plugin. Now, you can select it but for the sake of better alternatives to Jetpack, you can scroll down below and skip this step.

When you’re done with all the steps, save your settings. You are now ready to start selling.
Entering Products on WooCommerce
When you’ve set up your WooCommerce store, it’s time you start adding products.
If you have plenty of products in your store, then it’s going to take a long time to add all the products to your store.
But WooCommerce makes the product addition process very easy.
From the dashboard, visit Product > Add New to add products.
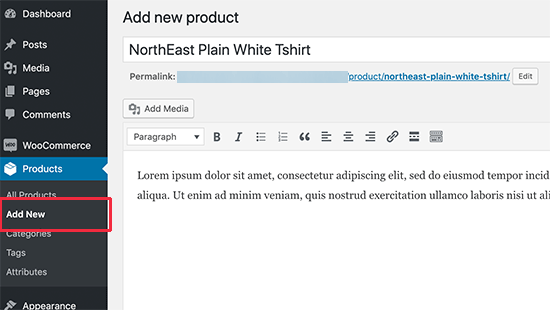
Provide a name for the product, and then its description.
Afterwards, click on “add new product category” in the right-hand column. If you’ve already set the product category, you can add the product in those categories.

Once you’ve added product categories, it’s time you add product data. This process includes adding the product type, pricing, shipping, as well as other relevant information.

When that’s finished, you can add a short description of your product to make sure it’s being bought.

We know, it’s a drag to add too many product descriptions but they hold tremendous SEO value.
Next up is images. The product page you create will look visually better when you have additional images that highlight the features of a particular product.
It’s super easy to add product images and galleries that go along with each particular product.

You can create multiple images in order to create a product gallery.
Before you hit publish, make sure all the information is added accurately.

Keep repeating the process when you’ve finished adding all the products.
Conclusion:
And there you have it. You’ve successfully created a barebones eCommerce store on WordPress. Now, there are plenty of other considerations you have to look at, but for the sake of brevity, you should focus on these considerations first up.
We hope this article provided you with a quick guide to creating a WooCommerce store.


